Creating a Python Package
Simple steps to go from code to a widely installable Python Package
Package Idea
Recently, I had the idea to create a Python package using tools that I have been needing heavily in the past month or so for my PhD research. I believe that I may need these tools to be more general in the future and also know a few people who may be introduced in similar features. I was curious as to how Python packages can be created and distributed so I decided to create one with the aim of having it available through a pip install and also with full documentation on a website (in this case “read the docs”).
Package Purpose
The package itself is called CoSpecPy and is used to make composite spectra of quasars. This is essentially a process of downloading, stacking and averaging spectra in order to characterise the spectral properties of a whole population of quasars. I also wanted to include some useful features for plotting the spectra or set of spectra afterwards.
All of the spectra to start with would come from a survey called the Sloane Digital Sky Survey. This survey has only surveys from which we can request files for download and processing. Pretty picture of the telescope used is below:

I decided that it would be best to split the package into three main processes to aid this: Downloading, Composite making and Plotting. Each of these sections can feed into each other.
Workflow
I think in an ideal world one would start with the packaging and documentation process in mind but I think I’ll talk this through from my perspective. In this case, I had a lot of the code I needed already written and so I began by working together some of that into some useful code. To make things easy to understand I pieced together the code into larger classes that the user would primarily create and act upon. After that I worked on how to package that code and then finally I worked in the documentation process and how to update it automatically based on the latest changes.
Code Creation
Version Control
It’s always best to start by creating some sort of version control process and for this project I am using git with github.com as a host. It’s a simple start:
mkdir CoSpecPy
cd CoSpecPy
git init
touch README.md
I then spent a little time creating the README and treating it as a bit of a to do/wish list. I wanted to be very clear about what I wanted to create and offer.
Once I had a bit of a plan I just commited those early changes. If you haven’t used git before I’ll briefly cover how to commit changes but from then on I’ll leave it out but let you appreciate that whenever I felt I added something important and it had been tested to work I would then commit that with a useful message.
Commiting changes with git
Once you have created/changed code to a state you are happy with you can “stage” those changes. This just means that when you next make a commit the currently staged changes will be comitted to the history of your project. Therefore you could stage something and keep working without yet comitting and a commit later without re-staging that file would only commit the previous changes.
To stage a particular file such as the README.md you can use the filename:
git add README.md
but in general you will find that most people will want to just stage all current files that contain changes. This can be done by
git add .
The next step is probably to add a remote. This is where you can store the history of your project remotely as well as on your own computer. In this case I wanted to use github. Therefore I logged into my account and created an empty repository with the same name as my project. Some people recommend by starting the otherway round and creating the project in github followed by cloning it to your own computer but I worked this way round.
To set up the remote repository you need to get the url of the project. For this one it is https://github.com/jwpetley/CoSpecPy. Then you can add the remote like this:
git add remote origin https://github.com/jwpetley/CoSpecPy
Finally, we can now commit all of our coding changes and send them to our remote. It is important to include a useful message for when we look back through our changes in the future.
git commit -m "Useful message here"
git push
It will probably ask for your github password at that point which is now actually a token that you must generate and save through the developer area of your github settings.
I hope this explains the general purpose and method of adding code to your history and how to connect it to github.
Python Code
Now it was time to actually write the code that will form the basis of the package. For a good project structure I recommend creating another directory with the same name as your project within your current directory and inside that creating a directory called test where you can run little tests for your code on the fly. I also needed a data directory where I could store some example data with which to supply users with some easy access features to try.
CoSpecPy/
├── CoSpecPy
│   ├── data
│   └── test
├── README.md
Your directory will likely also contain a .git directory which is what git uses to save the history of all your changes through hashed objects but this can be ignored for now.
Download handling code
I decided to start with the code I wanted to handle the downloading of spectra from the SDSS servers. I created a file downloads.py in which I would create all the code for download creation. To make this most aplicable to general users the best method to implement these features is in that of a Class that contains methods (functions applicable to that class). To give you an example I will demonstrate the class instantiation and some other useful functions below.
class DownloadHandler:
    '''Control acces to SDSS spectra
    '''
    def __init__(self, download_method, no_of_connections,
                    batch_size, download_folder):
        if download_method != "aria2" and download_method != "wget":
            raise Exception("Valid Download Method is either 'wget' or 'aria2'")
        self.download_method = download_method
        self.no_of_connections = no_of_connections
        self.batch_size = batch_size
        self.download_folder = os.path.abspath(download_folder)
    def download_spectra(self, download_file):
        '''Download spectra from a file.
    '''
        if self.download_method == "aria2":
            call(['aria2c', '-c', '--check-certificate=false',
            '-j', str(self.no_of_connections), '-i', download_file],
             cwd = self.download_folder)
	if self.download_method == "wget":
            call(['wget', '--no-check-certificate', '-c',
            '-i', download_file],
            cwd = self.download_folder)
This example contains only minimal docstrings (small string segments that explain the purpose of a function), and we will return to this issue later.
Composite Handling Code
The composite handling code is very similar to that of the Download Handling code and in fact it incorporates some of the properties of that earlier Class. I think it would be excessive detail to continue to write about this Class here and instead I should simply point you to the GitHub repository for this project if you would like to learn anymore about this section of the project https://github.com/jwpetley/CoSpecPy.
Submitting a Project to PyPi
To submit a project on PyPi for the purposes of pip installation, one must have a unique project name and a valid setup for the project build within your working directory. A version needs to be rolled up into a compressed format called a distribution. With the proper setup.py formatting a distribution can be made simply by python setup.py sdist. This will save the distribution as .tgz files in a new dist directory in your root folder.
The next step is to create and register an account on pypi.org. This is where the package can be hosted and then distributed. To make this process simple the final upload of the package can be achieved using a package called twine. This can be installed through pip install twine. Once happy with your package and the distribution then simply run the command twine upload dist/*. It will prompt you for your PyPi username and password at this point. Head to your PyPi account to see your package, now viewable and installable to the whole world!
Documentation - Sphinx
In a standard workflow it would probably best to start with documentation as you work. I mean documentation beyond just commenting some lines! Proper documentation with doc strings for all functions and classes and proper explanation of each of the function arguments and returns.
A useful package for the aid of Python documentation and distribution is the Sphinx package (pip install sphinx). This package can allow you to create a docs directory in the root of your project folder which contains the tools to create pdfs, html and LaTeX documents which you can use to share your code.
Sphinx has a handy quick-start feature that will setup the necessary structure and files within whatever project you are working on. Once Sphinx is installed and your are in the root directory of you project, you can execute the following commands to initialise Sphinx documentation.
mkdir docs
cd docs
sphinx quick-start
It will then ask you a series of questions about how you want your project configured. Once finalised it will create the necessary file structure and make files for your documentation as well as a basic configuration setup and homepage!
Writing Documentation
Sphinx uses as a default the mark-up language of reStructured Text. This is a similar language to markdown but with greater flexibility in the creation of code blocks and other features. It also is able to access the content of your package and create automatically generated documentation for your code if you like. Sphinx provides a helpful ReStructured Text primer on their website at https://www.sphinx-doc.org/en/master/usage/restructuredtext/basics.html.
The approach I took was to create some introductory pages explaining the installation process and a quick start guide, while the rest of the documentation outlining all of the classes and methods would be generated automatically.
Beyond the introductory pages I created a restructured text file (.rst) for each of my Classes. Within this file one can simply use the autodoc feature of Sphinx to create documentation (explanation and example below).
Napoleon
Since I am very familiar with numpy and scipy documentation I thought it would be best to emulate the examples found within those packages within my own. These packages use a doc string style that requires a particular syntax. The syntax is as follows:
Class MyClass:
        '''Class Name

         Brief description of Class. Purpose and features

        Attributes:
             arg1 (type): Description of arg1
             arg2 (type): Description of arg2
            etc.
        '''


    def init():
        '''Function Title

         Brief description of function. Purpose and explanation

         Args:
            arg1 (type): Description of argument
            arg2 (type): Description of argument
            etc.

         Returns:
            return1 (type): Description of return
            return2 (type): Description of return

        '''
    def all_the_rest_of_code():
        code = "etc...."
This is style of documentation is the Napoleon style. To enable Sphinx to understand this style you must specify it within the Sphinx conf.py file. This is located within /docs/source/conf.py if you have set up your project in the same way as I have described so far.
Within the conf.py file there should be an empty list entitled extensions = []. Within this add the two in-built extensions - extensions = ['sphinx.ext.autodoc', 'sphinx.ext.napoleon'].
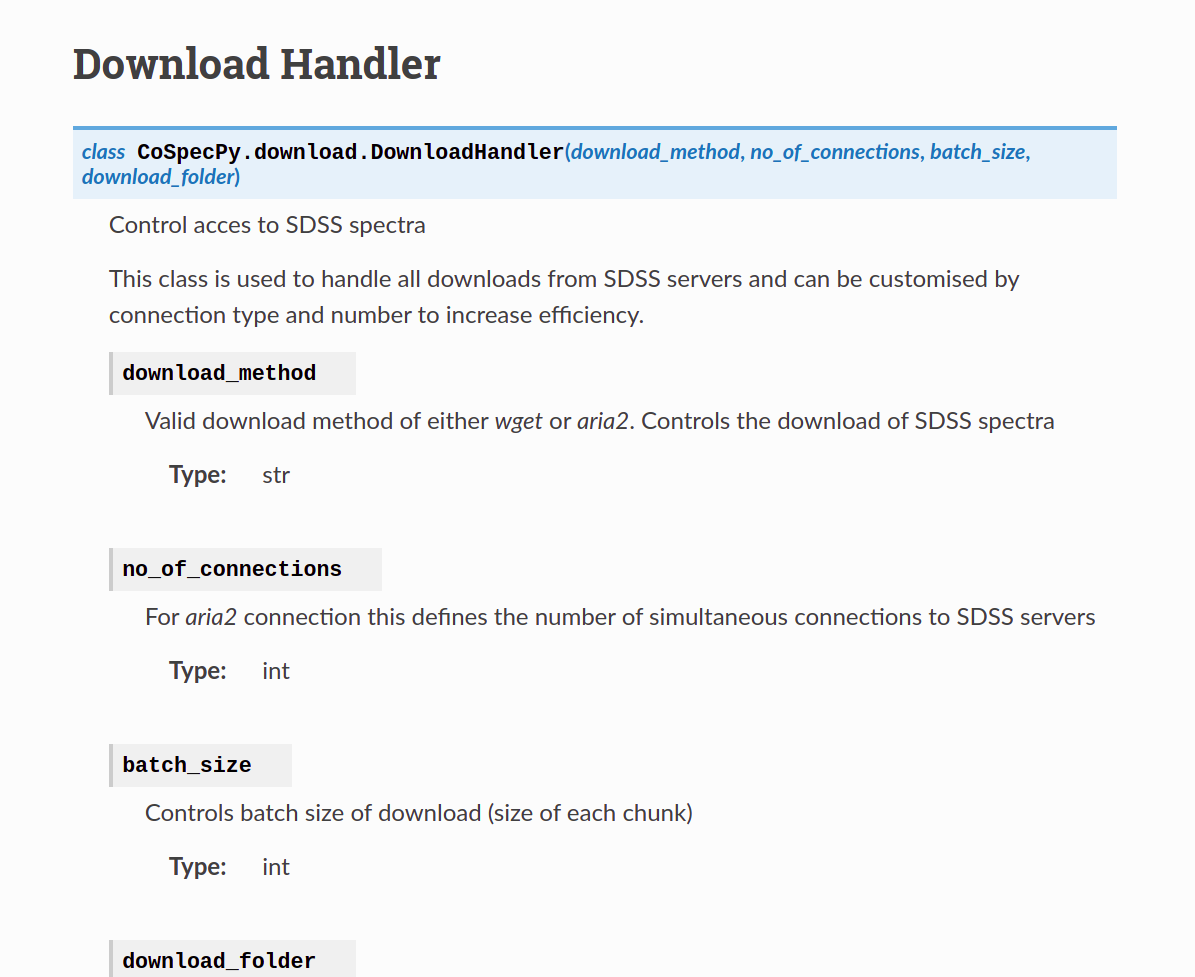
With all these pieces in place you can now create automatic documentation for all of your code with just a few lines. To describe all the features of my download handler I create a file /docs/source/DownoadHandler.rst. Within this file I add a title and two lines of code
Download Handler
=================

.. automodule:: CoSpecPy.download
	:members:
If you now run make html from within the docs directory you should be able to make something like this
In your index.rst file you can add the following code so that you can link to this output.
=====================
Full Documentation
=====================
.. toctree::
	DownloadHandler
You can now repeat this process for all of the code that you like depending on whether you think it is relevant to make the full documentation viewable.
The final process for me was to connect this all to https://readthedocs.org/. This website allows you to upload you code and it will create a publicly available documentation website for yu and automatically update it whenever you code is updated on your linked GithHub repository! There are many great tutorials out there for this with a little bit of googling.
Thanks
Thanks for taking the time to look through this small tutorial on Python package creation. If you have any extra questions feel free to get in touch with me on GitHub or Twitter.